Thursday, 29 October 2020

Elmo Christmas Jumer: available now!

Is there anything more festive than Elmo in a Santa hat? If that’s your sort of thing, then keep reading!

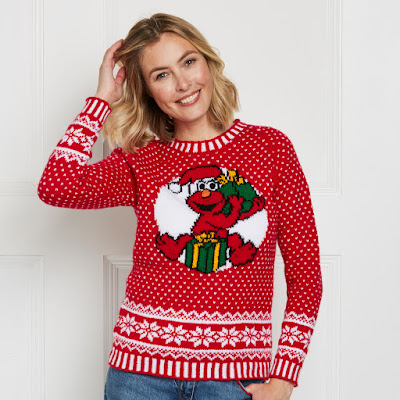
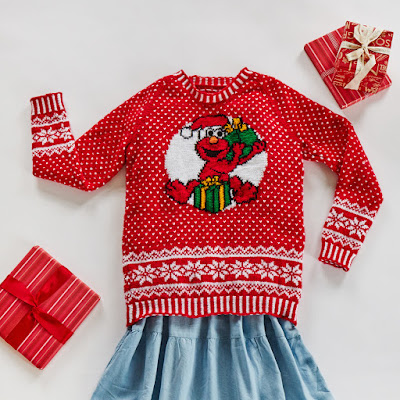
I have a new design out in the latest issue of Knit Now Magazine, and, as you may have guessed from my opening lines, it’s a festive jumper featuring Elmo in a Santa hat!

White lady wearing a red festive jumper with allover colourwork and large Elmo motif
Elmo Christmas Jumper - image copyright Practical Publishing


The jumper is knitted in pieces from the bottom up, then seamed. The pattern has an all-over stranded design, with Elmo knitted in using the intarsia technique. This is a design to take slowly, enjoying every stitch, and you’ll be so proud when it’s complete, and everyone else will be so impressed when you tell them you knitted it yourself!

The jumper is knitted in Stylecraft Special DK,* and the pattern is written for nine sizes (XS to 5X, finished chest sizes 76.5-160 cm). They yarn is really affordable, and even the largest size will only set you back less than £30. If you prefer something a little woollier, West Yorkshire Spinners ColourLab DK* is an excellent 100% wool alternative.

Flatlay of a red festive jumper with allover colourwork and large Elmo motif
Elmo Christmas Jumper - image copyright Practical Publishing

Want to knit the jumper for yourself? The pattern is included as a pattern card with issue 121 of Knit Now Magazine, which is available now. Please note that the pattern card is only included with UK editions of the magazine, not those purchased overseas, or the digital edition. The good news, however, is that Craft Stash will ship the UK print edition internationally (subject to availability), so you can get your hands on a copy, wherever you are in the world.

Do you want to add Elmo to your Ravelry queue or Favourites? The pattern page can be found here.** It really helps me if you share your love for the pattern.

Have you made the Elmo Sweater? Don’t forget to share your pictures with me! I love seeing your finished knits.

*Affiliate link.

**Ravelry link. May cause issues for people with photosensitivity; proceed with caution.

Wednesday, 28 October 2020

Steam blocking your knitting

Do you want your knitting to look its best? Do you ever find that when your knitting comes off the needles, it curls at the edges and doesn’t lie as flat as you’d like?

The answer is blocking!

Blocking is an important part of knitting: it smooths the knitting out, making it lie flatter and fixing its shape, while also smoothing out any wobbly stitches. Blocking is useful for items that need to be seamed – you can block all the pieces so they lie flat, then sew them all together once they are less prone to curl. If you’re picking up stitches, it’s much easier to do so from fabrics that have been blocked. Wet blocking works well for animal fibres, but doesn’t work so well for acrylics, which is where steam blocking comes in.

Steam blocking uses steam to penetrate the fibres in the acrylic. Acrylic fibres are made of plastic, which melts at high temperature; when you steam block an item, you’re not melting the fibres, just heating them up enough to set them in their final position. Steam blocking is permanent and gives an excellent finish to items knitted using acrylic yarns.

Steam blocking isn’t just for acrylics. You can also use it for other fibres: you might find it useful if you’re knitting a sweater and want to check how much longer to make a piece before you cast off. Rather than give the garment a full wet block, lie the knitting out and steam it so it can reveal its finished dimensions!

So, how do you steam block your knitting?

What you’ll need

  •  Ironing board (or a smooth, hard, heatproof, surface you’re happy to iron on)
  • Steam iron
  • Water
  • Towel (large enough for your project to lie on once the towel is folded in half)
  • Stainless steel sewing pins, ideally with brightly-coloured glass heads

Preparation

  1. Put up your ironing board or get your surface ready for ironing.
  2. Fold your towel into at least 2 layers and place it on the ironing board.
  3. Lie your knitting out on the towel, and pin it in place. Ensure the knitting is completely smooth, and any ruffles, etc., are pinned as you wish them to lie after steaming.
  4. Fill the steam reservoir of the iron with water. Switch the iron on to a high temperature with steam functionality and allow the iron to heat up.
  5. Switch the iron to the steam setting.

Steaming the knitting

  1. Hover the steam iron over the knitting so the steam fully penetrates the knitting. DO NOT LET THE IRON MAKE CONTACT WITH THE FABRIC! If the iron contacts the acrylic, the acrylic will melt.
  2. Use your hand to smooth out the knitting while the knitting is warm and damp. DO NOT PUT YOUR HAND IN THE STEAM! Steam is hot and will scald you.
  3. Work on one area of the knitting at a time. Once the whole piece has been steamed and smoothed, leave the knitting to cool and dry.
  4. Once the knitting is completely cool, remove the pins from the knitting and admire your finished work.


That’s all there is to it! If you found this tutorial useful, why not recommend it to friends? You can share it using the buttons below.

Pattern shown is Halloween in the Windows by Vikki Bird Designs. Available on Ravelry,* PayHip and LoveCrafts

*Ravelry link: may affect people with photosensitvity; proceed with caution.

Thursday, 22 October 2020

#showoffyourwoollysocks2020

My celebration of woolly socks, #showoffyourwoollysocks, is back for 2020!

Do you have socks that you knitted and showed off once online, but since then they've been hidden in your shoes? Well, #showoffyourwoollysocks2020 is a chance to show them off! Every day in November, I'll be sharing a photo of the socks I'm wearing on my Instagram (@vikkibirddesigns), and telling you the story behind them, and I would love you to join in too. Simply take a photo of the handknitted socks you're wearing every day in November and tell me all about them! Use the hashtag #showoffyourwoollysocks2020 and tag me so I can see them. I cannot wait to have a little tour through your sock drawer!

This year, I'm going to host a knitalong, so that over the course of November, we can all knit a new pair of socks together and wear them on November 30th! The KAL will take place on Instagram using the hashtag #SOYWSKAL2020, and works in progress will also be allowed if that increases your chances of having a finished pair of socks by November 30th.

Not on Instagram? I'll be sharing a summary of my woolly socks once a week on my blog (vikkibirddesigns.com), and I'll have two threads open in my Ravelry group (Ravelry link - may cause issues for users with photosensitivity; proceed with caution): one for the KAL and one for you to show off your socks of the day.

I can't wait to start showing off my socks, and hope you are just as excited!

Do you want to knit a pair of socks from one of my patterns for the KAL? From now until November 7th, all the sock patterns in my Ravelry store will have 20% off with the code SHOWOFF You can find all my sock patterns here: https://www.ravelry.com/bundles/sock-patterns-179 (Ravelry link - may cause issues for users with photosensitivity; proceed with caution).

Thursday, 15 October 2020

Sugar Cube Knits: perfect for crunching through leaves!


What’s your favourite part of autumn? Crunching through leaves? Collecting conkers with your kids? Curling up warm at home under a cat and some knitting?

One of my favourite parts of autumn is being able to unearth all my knitwear from its summer-banishment under the stairs! There’s something delightful about the first wear of mitts on a slightly chilly autumn day, and I’m sure you’ll agree.


It’s also lovely to make something new to herald a new season, and I’m here today to share some new knits that are perfect for autumn with you: the Sugar Cube Knits.

The Sugar Cube Knits are inspired by one of the activities I’ve missed most this year: knitting in coffee shops with friends. The set of mitts, cowl and hat features a simple textured stitch pattern, made up of knits and purls, that looks like stacked sugar cubes.


The set uses a beautiful tonal brown DK yarn, dyed specially by Blue Fern Yarns, to evoke the warm tones of brown sugar. I used a merino/bamboo blend that really helps the stitches to pop.

This Sugar Cube Knits set was produced in collaboration with Blue Fern Yarns, and Shannon is offering 10% off the yarn used in the patterns when you buy the patterns. You can buy one, two or three skeins, in either Platinum DK (merino nylon) or Boo DK (merino bamboo) using the discount, and Shannon will dye the yarn especially for you. A perfect yarn treat to celebrate the season! To get the discount code, you need to purchase the pattern from either of my Ravelry or PayHip stores. Once you’ve purchased, you’ll find an extra pdf, which contains the discount code.


Want to buy the patterns now? You can get 20% off with the code LEAVES.*

Sugar Cube Knits on Ravelry**

Don’t forget to add the patterns to your Favourites and Queue – it really helps other people see my patterns.


Ravelry not for you? You an also use the discount code for the Sugar Cube Knits on PayHip

*Code expires 11.59pm BST, Thursday 22nd October 2020. Code applicable on both Ravelry and PayHip.

**Ravelry links may cause issues to people with photosensitivity, proceed with caution.

Tuesday, 13 October 2020

Spooky new patterns for Halloween!

Looking forward to Halloween this year? Obviously things will have to be a little different because of the pandemic: I saw an excellent suggestion online though: rather than trick or treat, why not go on a pumpkin hunt? If everyone puts up pictures of pumpkins in the windows, kids can go for walks and keep their eyes open for all the pumpkins! I’ve taken this idea a step further, with banners for a ghost, a witch and a pumpkin, and I can’t wait to hang them in the windows for them to be admired. 

Fancy knitting your own Halloween banners? They’re perfect for hanging in windows, or on walls, and they’re the same size as my Rainbows in the Windows banners, so you could just swap them over for a few weeks! The pattern is written for one basic banner that can be decorated with your choice of three intarsia motifs: a ghost, a pumpkin or a witch. The patterns for the intarsia portions are provided as both charts and written instructions. If you’re not a fan of intarsia, you can knit the banner without any colourwork and use duplicate stitch to add the motif at the end.

Each banner uses a small amount of aran weight yarn in a limited palette, and is perfect for stash-busting, or you could buy the yarn you need and make a few extra Halloween banners for friends and family from your leftovers. If you have leftovers from your Rainbow banners you’ll just need to get hold of some black aran weight yarn (sock yarn held double would also work well if that’s what you have to hand).

Want to buy the pattern now? You can find it on Ravelry* and PayHip. Use the code SPOOKY to get 20% off until 11.59pm BST, Tuesday 20th October 2020.

The pattern will also available on LoveCrafts later today.


Did you know? Favouriting my patterns on Ravelry helps spread the word about them, so if you like the pattern, please go and add it to your Favourites!  

********

Here’s everything you need to know about the pattern…

Sizes

One size: 30.5 cm [12.25 in] wide x 30 cm [12 in] high

Tension

18 sts and 25 rows = 10 cm [4 in] in stocking stitch worked flat on 5 mm (US 8) needles after wet blocking, or size needed to obtain correct tension.

Yarn

You will also need aran-weight yarn in the following colours and amounts, depending on which design you are making:

Ghost

                 A (black): 130 m (145 yds)

                 B (cream): 40 m (45 yds)

Witch

                 A (black): 35 m (45 yds)

                 B (cream): 60 m (70 yds)

                 D (purple): 130 m (145 yds)

Pumpkin

                 A (black): 130 m (145 yds)

                 C (orange): 55 m (65 yds)

                 E (green): 5 m (10 yds)

Needles

                 5 mm (US 8) straight needles

Notions

                 Fixed stitch markers x 2

                 Tapestry needle

                 Bobbins for holding the different yarn colours during colourwork (optional)

                 Chart row marker (optional)

                 2 lengths of dowel, 35 cm [14 in] in length and 1 cm [0.5 in] in diameter

                 Hanging thread

                 PVA glue (optional)

Pattern notes

The sample is knitted in Paintbox Yarns Simply Aran (aran, 184 m per 100 g ball, 100% acrylic) in 201 Pure Black (A), 202 Champagne White (B), 219 Blood Orange (C), 247 Pansy Purple (D) and 228 Lime Green (E).

Instructions are provided for three designs. For each design, you will need to print out the written instructions for the plain banner (page 3) and either the chart or written instructions for the picture of your choice:

1. Ghost (EASIEST)

a. Chart, page 4

b. Written instructions, pages 5

2. Witch (INTERMEDIATE)

a. Chart, page 6

b. Written instructions, page 7

3. Pumpkin (INTERMEDIATE)

a. Chart, page 8

b. Written instructions, page 9

The pattern is designed to be worked using intarsia for the colourwork portions. If you prefer, you can work the banner in a single colour, then add the colour work at the end using duplicate stitch – the yardages given should be sufficient for you to complete the banner this way. Links to introductions to intarsia and duplicate stitch are provided in the Resources section (see page 10). You may wish to use a combination of intarsia, stranded colourwork and duplicate stitch to minimise ends.

Pattern edited by Jo Torr.


*Ravelry link: proceed with caution if you suffer from photosensitivity.